Tuesday, 1 December 2015

Health and Safety and What I have used

Health and Safety 

  • Ensure all work space is clean and clear of previous hair styling tools or makeup residue
  • place all work products out so all are visible 
  • make sure everything used on the clients hair is clean beforehand and after 
  • check for contraindications before working on the hair, some of these may include: head lice, dandruff, ringworm of the scalp and folliculitis. 
  • when working with a client, never diagnose an issue; it is best to inform the client of what you see as a hair designer and advise them to see a doctor.  
  • be aware of open wounds and scars on the head and in the hair, this could effect the person when parting or brushing the hair. 

What I have used:

  • Brush 
  • pin tail comb
  • thicker comb 
  • set of thin and thick brushes
  • crimping tongs
  • curling tongs
  • straightening tongs 
  • prop-rat 
  • grips and clips 
  • bought hair spray and wax
  • gold glitter spray 
  • crown clip for final design 
  • thin elasticated hair ties   

Thursday, 26 November 2015

Hair Assessment, Matida's design, evaluation and peer review

Hair Assessment 

The start: 
I set up my space in the hair studio, ensuring all my equipment and products were clean and hair free. I made sure my work space was also clean and that my brushes, hair grips and wax was placed out neatly so everything was visible and easy to grab when I need them. I made sure Matida's hair was brushed and ready for crimping.

I had practiced Matida's design independently on her and on my Kate doll, to be sure I was confident and pleased with the outcome. Going into the assessment I was confident and completely sure that I would finish on time and to the standard of quality Matida and I expect from her design work. I was fully prepared with all the hair accessories and products that I needed for the assessment and used the wax and hairspray provided. I followed Matida's hair chart instructions and completed the design within time and to a point where I was particularly happy with it. 

I think this time that I accomplished the design was the most successful; as I was fully confident, I didn't need any prompts and I had everything I needed. I spent extra time on perfecting the finished design to ensure it was even on all sides, and there were as little stray hairs as possible. For an extra smooth texture I used the wax and holding spray to secure the look and keep the hairs tucked away.I found this look to be simple but effective, it was a very classy design that held the inspiration ideas well. The look was supposed to imitate a crown but with a modern day twist; I think the design was a good example of a historical idea made contemporary. The front section of hair that was crimped fit well into place even though Matida had had a hair cut and her hair was only just long enough, this was initially a worry for me because I didn't think the hair would reach to the back of her head, after practicing the look beforehand I found it much easier and less worrying to complete.  

Partners peer review:

My partner recently practiced my final hair design, which went very well. I feel that Rebecca created the design I wanted well and had very little problems creating my design in and out of practice sessions. We actively practiced outside of studio sessions so that she felt confident enough to complete my design in the final assessment and she also made efforts to ask Lottie for tips to perfect my design when she was unsure about things. Because of this, I feel that she was very invested in my design and understood well what I wanted for my final look. Communication was good between the both of us and we actively communicated through face book daily and in person when finalizing and discussing ideas and plans. Rebecca also had very good time management in the final assessment and also when practicing my design in studio sessions with Lottie and Helen, and although my design was quite simple and didn’t take long to create she made sure to perfect the design and her techniques used so that it looked exactly how I wanted. I feel that she has also shown development in terms of creating my look as whenever she found something difficult to create in my design she never gave up but just continued to practice until I was happy and she was confident she could recreate the look comfortably. For me this not only showed we again had good communication but that she was also very reliable and invested in my design as much as me. Overall, I feel that Rebecca was a very reliable and great partner to have for this hair brief and I am more than happy with my final outcome and the work we had practiced together.

What I used:


Hair assessment instructions; my design

Hair Assessment instructions: 


  1. Make sure all hair is brushed, section the hair into three parts; two sections at the front, ensure a side fringe is made by taking hair from the left side, part the rest of the hair in the middle, and one larger section at the back. 
  1. Crimp the back section of hair and plait it, going from right to left in a fish tail plait, pull out the top of the plait to make the design look thicker, pin the end of the hair to hide the hair band and grip.  
  1. Crimp the roots of the two front sections and curl the middle and ends of the hair 
  1. Place padding in the middle of both front sections of hair and build up the remaining hair around it, piling it on top of the head and then backcombing the curls to create wild volume. 
  1. Separate the middle parting to make it more clear and backcomb the curled hair 
  1. Place crown clip in the left side of the hair on show
  1. Spray with gold glitter spray  

Wednesday, 25 November 2015

Practice makes Perfect; Matida's design

Practice makes Perfect; Matida's design


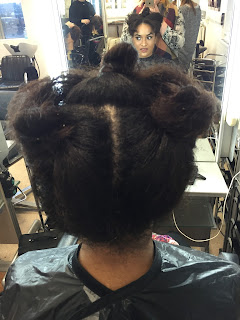
I enjoy doing Matida's design, I think the end result is pretty and gives a classy modern look to an Elizabethan look. Her design is a series of buns and involves crimping, the buns are there to imitate the shape of a crown and the crimped hair wraps around which gives the design the classy look, and finishes the idea of a crown. To smooth the back baby hairs I will use wax and hairspray, this will hold the hairs in place making the finished result look very neat and perfect for a photo. 

Tuesday, 24 November 2015

Hair assessment; my design, evaluation and peer review

Final Hair Design Assessment 

Planning for my final assessment was more stressful than completing it, I wanted to combine all my research and make a design that shows a big, curly and bouncy, Elizabethan style with a modern twist. My first inspiration came from the avant grade looks; there were many designs that used different forms of curls and crimping techniques and my favourite ones leaned toward loose flowing curls. I decided to use a curling tong to create my wanted look and then back-comb the hair and grip it into place. Because my hair isn't the correct texture or length to create this look I wanted to find a model with the perfect hair to ensure my look is exactly as I want it. 

Choosing a model was difficult because I wanted to make sure the hair would be the correct type to be able to pile on top of the head without feeling uncomfortable or heavy. It also needed to be thick enough to back-comb easy and create a textured volume. I didn't want to back-comb too much and lose the curls. I am very happy with the way my partner finished the look; padding was used to create an extra boost of volume and hight to the design and my partner, Matida, did well to execute the design and I did well to communicate it to her how I wanted it to be completed. I created a step b step guide for her to look at before the assessment, this was to make sure that if there were any problems she had, they wold be resolved last minute. 

I am very happy with the finished design and would not have created it any differently. I wanted to make the design stand out from the rest so I used a model with long thin hair and bought extra products and props to place in the hair to give it more of an Elizabethan influence. For example, I bought a small crown clip to pace in the hair, this was to accentuate the look of a Queen, I also bought gold glitter spray to use over the large bits of hair at the sides, a lot had to be used to create the effect I wanted but Matida did a god job to do this.

During my design practice and planning I was worried that the plait at the back of the head would look too much like a 'rats tail,' and so to change the idea slightly I made the plait into a fish tail. I did this because a fish tail plait can be made loosely and pulled out careful to create more volume. I also wanted it to fit in with the loose feel of my design as a whole and a fish tail plait worked best. 

As I was the sitter for my design and Matida the artist, I wasn't able to contribute or add any input, so during the hair assessment I designed and completed the makeup for the photo once the design was finished completely. 

Peer Review 

I enjoyed working with my partner; before the assessment started we hadn't spoken to each other that much so through this, a friendship has blossomed. We worked well in a pair because we took time out of lesson to practice the hair design, and communicated with each other if there were any changes to the design or any problems. I feel that she was confident in executing the design as we practiced with each other, on the 'Kate' doll and on my model. I made sure my partner was happy and confident with the design process; I made a short list of instructions and order for my hair design to make it easier for her, this then gave her more confidence to complete it on time and to the standard I wanted. I could see throughout the assessment she was working hard to get the design right to the hair chart and my explanations, she made sure the sections were neat and the messy parts were backcombed enough to stand out as much as I wanted. Overall I am very pleased with the outcome of my design and would be happy to collaborate with her again, as she works hard, practices her design techniques and is happy to take time out of her day to work with me on anything I am struggling with, and vice versa.  


Saturday, 14 November 2015

Gold Spray for my Final Design

Gold Spray


I have chosen to use gold hair spray to colour the hair of my model because I have used gold in my makeup design and I want the two contemporary Elizabethan styes to go together. I have chosen gold because hough my research I have found; gold was used throughout history to portray wealth, status and royalty, this has linked the two designs together and to the use of the colour in the Elizabethan era. Lettice and the housewives of Orange Country were portrayed to be very beautiful, independent and successful, they were also rich and knew how to control people, especially men with their beauty and power, I think the use of gold symbolises this in my design.  

Final Hair Design Instructions

Final Hair Design Instructions


Rebecca Southerden
Matida Salmon 


  1. Part the hair into three sections, two at the front and one larger section at the back, ensuring the left side of the front section has a little more from the right to form a side fringe 
  2. Crimp the roots of the two front sections and the back section for volume
  3. Curl the lower part and the ends of the two front sections of hair 
  4. Create a fish tail plait with the crimped section of hair at the back starting one side and draping over the shoulder of the other side
  5. Fit the padding in the middle of the two front sections 
  6. Pile the hair around the padding and clip into place 
  7. heavily backcomb the curled hair that is loose around the padding 
  8. clip into place to imitate a messy love heart shape 
  9. use hair spray and gold colour spray for the finish.  


Friday, 13 November 2015

Matilda's Final Design On Her; Practice

Matilda's Final Design

This is Matida's final hair design, she has chosen to style her look around the idea of a crown, I admire this idea and enjoyed creating the look for her. It didn't take as long as she had originally thought, it look under an hour, because I have plenty of time to create this look I will use this time to perfect it and make it exactly right to the hair chart she has created. 

The hardest part of this design was pulling the hair tightly at the back to create small buns at the top of the head to imitate a crown shape. I also found it difficult to make it look neat; Matida has many shorter hairs at the back of her head and making them smooth upward proved difficult without using a grip. To resolve this I used wax and hair spray to smooth the hair and hold it in place.  


Wednesday, 11 November 2015

My Final Hair Design On Model

My Final Hair Design 

This is my design practice with my partner Matida, and my model Holly. Holly has very long hair, so my original idea for the hair to be curled and backcombed will have to be adapted to suit the model. I will have to include padding into my design to keep the hair on top of the head without it falling or feeling uncomfortable. I also want the fish tail plait at the back of the head to come from the side and round to the other side of her shoulders, this will make the design more appealing to the eye.  

Unfortunately my design took longer than we had expected, so for my assessment, my partner and I will have to prepare the hair before hand, this will include curling the hair ready for backcombing and styling. During the assessment Matida will them place the padding in the hair, style the hair on top of the padding and then backcomb it, this part of the hair will already be curled. The hair will then need to be gripped into place to form the erratic love heart stye I want.    


Final Design Practice On Kate Doll

Final Design Practice 

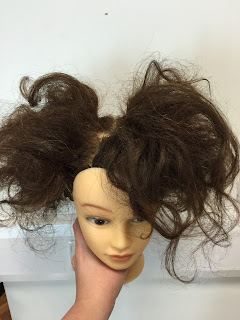
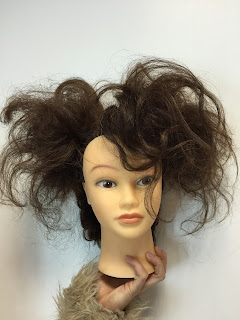
This is my final design idea that I have practiced on my Kate doll, I have decided to keep the look messy but bouncy with volume from curls and backcombing. This design came from inspiration I have found through Avant Garde designs and the original Elizabethan look. I research further into the Elizabethan era and found Elizabeth I's cousin Lettice, I found her personality bright and colourful and I wanted to portray this though my hair and makeup final designs. 

I parted the hair into three sections and made a loose fish tail plait with the back section, I then curled the two front sections, and made sure to have a side fringe included with the curls. I then backcombed both sections of curled hair and used grips to hold the design in place and also shape it to have a defined parting in the middle and to stick out at the sides. I am happy with my overall design because it illustrates an Avant Garde look while also holding the shape and fullness of Lettice's hair and personality.    


Saturday, 7 November 2015

Final design practice

Final Design Practice 


This is my design practice for my final idea, I started by planning my idea by making face charts, once I had finalised my design and chose my face chart, I then attempted the design on my 'Kate' doll. As my model for my assessment will have much longer hair I may have to change some of the techniques for making the large sections at the sides. I wanted to make the design contemporary, for this my inspiration came from the avant garde style from catwalks.


In my design plan I used three techniques; fish tail plait, curling using tongs and backcombing. Due to the length of my model's hair, I may need to use padding in each section to secure the design, I can then backcomb the hair to create more lift. Due to the length of the hair I may need to use grips otherwise the design will look too erratic and messy, I want the hair to look free and bouncy; but to hold a similar shape to the Elizabethan love heart.  


I practiced a loose fish tail on one of my housemates, the design was very loose and needed some refining. I will practice the design so I am confident enough to explain and be able to talk about it step by step to my partner so she can execute it with the same confidence.